News

How To: Pair Your Headphones, Earbuds to Device

Published -

Bluetooth can be tricky sometimes, we get it. It's an evolving technology that is always improving. However, it's still reliable and fun and avoids the fuss of tangled wires (thankfully). Bluetooth technology gives you more mobility to get out there and GO so let's get connected.

True Wireless

Here's how to pair your true wireless earbuds to a device. While this example and video below shows our JBuds Air Executive as an example, the steps will apply to other true wireless earbuds.

General Pairing Steps:

  • Open the case and remove the pull tab and take the earbuds out of the charging case
  • Once they are out one earbud blinks blue and white indicating that they are ready to pair to your device
  • Turn on bluetooth on your device and select your device name
  • You will hear a voice prompt saying "Bluetooth Connected" followed by blinking white lights on indicating that you are connected
  • Now when the earbuds are taken out of their earbuds case they will auto power on and reconnect to your device
  • When connecting to a new device or when you are having trouble connecting make sure Bluetooth is turned off or disconnected on any previously connected device

  • Pairing Based on Earbud Model Name / Model Number:

    For a reference of all models feel free to check out our Manuals Page.

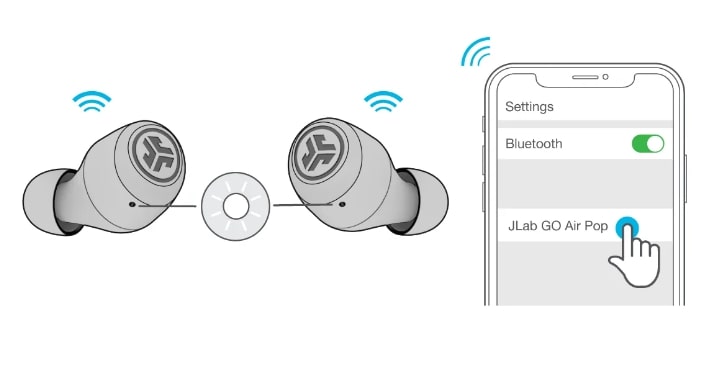
    GO Air Pop & GO Air Tones

  • Remove pull tab. The charging case light will start pulsing blue.
  • Remove pull tab.
  • Red light indicates charge. Remove Earbuds from case.
  • Red light indicates charge.
  • One earbud will blink blue/white which is our bluetooth icon indicating ready to pair your device.
  • One earbud will blink blue/white indicating ready to pair to your device.
  • Select Device Name in your device's Bluetooth menu settings to connect. Make sure you turn on bluetooth. Voice prompt "You're connected" followed by blinking white lights will indicate you are connected.
  • Select Device Name in your device's Bluetooth menu settings to connect.

    GO Air

  • Remove pull tab. The charging case light will start pulsing blue.
  • Remove pull tab.
  • Remove earbuds by pulling straight up or from the side.
  • Remove earbuds by pulling straight up or from the side
  • One earbud will blink blue/white which is our bluetooth icon indicating ready to pair your device.
  • One earbud will blink blue/white indicating ready to pair to your device.
  • Select "JLab GO Air" in your device's Bluetooth settings to connect. Voice prompt "You're connected" followed by solid white lights will indicate you are connected.
  • Select Device Name in your device's Bluetooth menu settings to connect.

    Epic Air Sport ANC (Active Noise Cancelling)

  • Take earbuds out of the charging case and remove stickers.
  • Take earbuds out of the charging case and remove stickers
  • Press and hold 3+ seconds on each earbud. Blinking blue and white light on one earbud will indicate ready to pair to your device.
  • Blinking blue and white light on one earbud will indicate ready to pair to your device.
  • Select "Epic Air Sport ANC" in your device settings. Voice prompt "Bluetooth connected" followed by solid white lights will indicate you are connected.
  • Select Device Name in your device's Bluetooth menu settings to connect.

    Epic Air ANC (Active Noise Cancelling)

  • Take earbuds out of the charging case and remove stickers.
  • Take earbuds out of the charging case and remove stickers.
  • Press and hold 3+ seconds on each earbud. Blinking blue and white light on one earbud will indicate ready to pair to your device.
  • Blinking blue and white light on one earbud will indicate ready to pair to your device
  • Select "Epic Air Sport ANC" in your device settings. Voice prompt "Bluetooth connected" followed by solid white lights will indicate you are connected.
  • Select Device Name in your device's Bluetooth menu settings to connect.

    JBuds Air Pro

  • Take earbuds out of case and remove stickers. Place earbuds back in case and close door.
  • Take earbuds out of the charging case and remove stickers.
  • Blue lights on case indicates charging. Remove earbuds from case.
  • Blue lights on case indicates charging
  • One earbud will blink blue/white indicating ready to pair to your device. Select "JLab JBuds Air Pro" in your device's bluetooth settings.
  • Select Device Name in your device's Bluetooth menu settings to connect.

    JBuds Air & JBuds Air ANC (Active Noise Cancelling)
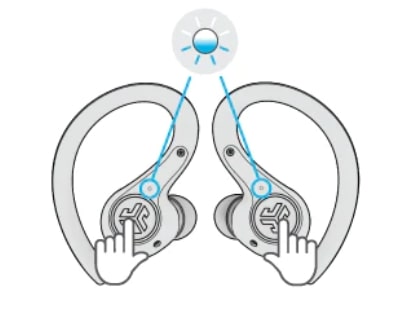
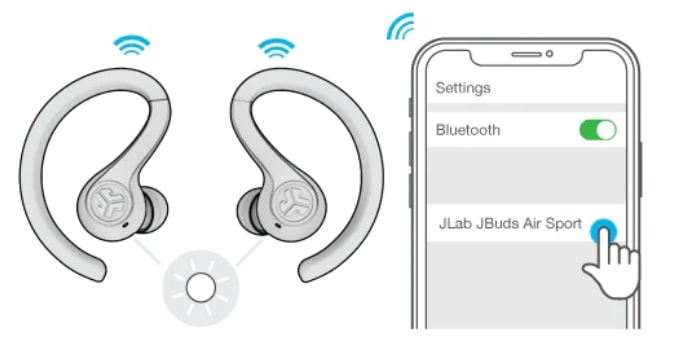
  • Auto-Connecting Earbuds: Press and hold the power button both buttons 3+ seconds to power ON. One earbud blinks blue/white indicating ready to pair to your device.
  • One earbud blinks blue/white indicating ready to pair to your device.
  • Connecting to Bluetooth: Select Device Name in your device settings. Voice prompt "Bluetooth connected" followed by solid white lights will indicate you are connected.
  • Select Device Name in your device's Bluetooth menu settings to connect.

    JBuds Air Sport

  • Auto-Connecting Earbuds: Take earbuds out of the charging case and remove stickers. Press and hold both touch sensors 3+ seconds to turn ON. One earbud turns solid white and the other earbud blinks blue/white indicating ready to pair to your device.
  • One earbud blinks blue/white indicating ready to pair to your device.
  • Connecting to Bluetooth: Select "JLab JBuds Air Sport" in your device settings. Voice prompt "Bluetooth connected" followed by solid white lights will indicate you are connected.
  • Select Device Name in your device's Bluetooth menu settings to connect.

    JBuds Air Executive

  • Auto-Connecting Earbuds: Take earbuds out of the charging case and remove stickers. Press and hold both touch sensors 3+ seconds to turn ON. One earbud turns solid white and the other earbud blinks blue/white indicating ready to pair to your device.
  • One earbud blinks blue/white indicating ready to pair to your device.
  • Connecting to Bluetooth: Select "JLab JBuds Air Sport" in your device settings. Voice prompt "Bluetooth connected" followed by solid white lights will indicate you are connected.
  • Select Device Name in your device's Bluetooth menu settings to connect.

    Epic Air Sport

  • Take earbuds out of the charging case and remove stickers.
  • Take earbuds out of the charging case and remove stickers
  • Press and hold 3+ seconds on each earbud. Blinking blue and white light on one earbud will indicate ready to pair to your device.
  • Blinking blue and white light on one earbud will indicate ready to pair to your device
    Connect Bluetooth Earbuds: First Time Set Up


    Wireless Earbuds

    Here's how to pair your Bluetooth earbud to a device. While this example and video below shows our JBuds Pro Bluetooth Signature Earbuds as an example, the steps will apply to many of our earbuds and headphones.

    Connect Bluetooth Earbuds: First Time Set Up

    How to connect to Bluetooth graphic

    Headphones

    Rewind Wireless Retro Bluetooth Headphones

  • Take earbuds out of the charging case and remove stickers.
  • Take earbuds out of the charging case and remove stickers
  • Press and hold button for 10 seconds. Release. Light will blink red and blue near the foam ear pad to indicate pairing mode.
  • Light will blink red and blue near the foam ear pad to indicate pairing mode
  • Select "JLab Rewind" in your device settings to connect. Light will slow blink blue when Bluetooth is paired.
  • Light will slow blink blue when Bluetooth is paired.
  • Flex Sport Wireless Headphones
  • Neon HP Connect to Bluetooth

    Looking to connect to your computer?

    Connecting to computers - both PC and Macs can differ by device and also depends on the most recent operating system (OS) of each device. Here's some specific guides to help:

    PC: Here's how to Bluetooth connect to your PC

    Mac: Here's how to Bluetooth connect to your Mac

    For more Customer Support help head to our FAQ page or call 1-405-445-7219.

    What’s new and hot at JLab
    Explore Best Sellers
    Find the perfect headphones for you
    Take the Quiz
    Back to blog

    ▼ Discover More ▼